
Advanced Field Communications Operator Notes
Introduction
The primary goal of a Stormtrooper in combat is to locate and destroy the enemy. An enemy target could be a person, creature, a group, building or vehicle. This section will teach you all about locating and identifying targets and the proper procedures for relaying the information that will ensure that the target is obliterated with the minimum effort.
Location and Identification
Location - There are many ways in which we and our enemies can betray their positions. Examples include:
- Shape
- Silhouette
- Surface
- Movement
- Spacing
- Noise
Stormtrooper armor is not the most effective camouflage and our enemies do not run about in shiny white stuff. Taking the above list into consideration we can work out ways to make sure that we see them as quickly as possible. Even though all of the paragraphs below talk about our own situation, these comments are also to be used as a location guide.
Identification
Shape - Try as they might, an individual’s shape will give them away, and if you are working in a situation where you are trying to stay concealed then you have to break up the outline of your body. Your armor, body and even your vehicle is covered with edges and curves which do not occur naturally. These edges need to be broken up by using netting and/or materials from the surrounding area as camouflage.
Silhouette - When on patrol and wherever possible, keep away from the horizon line. Do not walk directly across the top of a hill because when you pass over it your shape will be outlined by the sky. No matter how much you try and break up your shape you will be very visible as a person, not a bush…
Surface - A major drawback of normal Stormtrooper armor is that it has a nice shiny white color. Light reflects off of its surface, and this is also the same for much of the equipment that we use. Even black armor is normally highly polished so light will be reflected by it as well. Employ camouflage techniques or, where possible, use different armor.
Movement - Movement occurs in nature and catches the eye. When in a hide location movement should be kept to an absolute minimum. If you are looking at a hill covered with shrubbery and bushes then look out for things moving incorrectly. Bushes not moving at all while others around them sway in the wind or they sway against the direction of the wind are causes for concern.
Spacing - Uniformity is taught on Carrida. Structured drill movements, formations, etc. In nature nothing is uniform or structured. Look for signs of uniformity such as troops moving and keeping their spacing between them equal. Distance between troops should be staggered so that no patterns occur.
Noise - At night, without the use of night vision or infrared assistance, our eyesight degrades and our other senses are relied upon more to locate the enemy. With this in mind, sound seems to travel further and our hearing becomes the sense that we rely on most. Footsteps across woodland appear to become amplified. Keep in mind that the enemy will also be listening!
Reporting Tools
Once an individual spots the enemy they have to think that they are the only person who has spotted them. If they see a Rebel section dug into bunkers and does not report it then that could result in a lost battle. Passing on this information and making their presence absolutely clear is very important. Standing up and shouting They’re over there! is not advised and would result in your own long-range decapitation by the enemy. There are two systems to for the proper way to report and both are very similar. On paper, neither of these gives any particular advantage over the other, but in the field one may be more useful than the other for whatever reasons. The first thing you must understand is where things may be located in relation to you so that you can properly relay the location of any targets.
Axis system
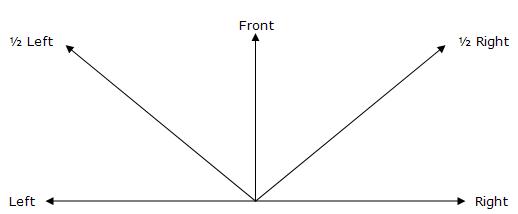
Here the trooper’s field of vision is 180 º. This is broken down into areas as shown above. This can be further broken down into 1/8ths, but it is advised that it is broken down no further than that. Using the system above it is possible to give a rough direction to the enemy. Then you give the distance…
Distance - How far away the enemy is situated is highly important, especially if mortar fire or other bombardments are going to be called down. Therefore judging distance is a must, and has implications throughout the remainder of this lesson. It should be remembered that distances should not be judged visually if these conditions exist:
- It is night time, as the eyes are less effective at judging scale in the dark.
- Or if the distance is over 300metres, as beyond this the changes in scale are too small to notice any real difference and so references are lost.
- If the terrain is uneven, as drops in height and larger dips in the ground play tricks on the eye, and so an accurate estimation cannot be made.
It is understood that Stormtroopers have automatic range-finding equipment incorporated within their helmets and weaponry, however this lesson deals with worse case scenarios. There are a few other things to keep in mind that will help your estimations to be more accurate. Targets will appear closer if these conditions exist:
- The object is in bright light
- They are bigger than their surroundings
- There is dead ground between you and them
- They are higher up than you
- The sun in your eyes
- The target is in bad light
- The target smaller than their surroundings
- Looking across a valley, down a street or along a path in a forest
- You are lying down
You should not attempt to gauge distances over 300m. A system to ensure accuracy has been provided below. Here you can see the difference in height between a target at 100m, 200m and 300m.
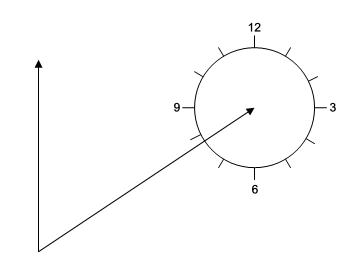
The Clock Ray Method
Now that you have given the direction and distance there are a couple of other ways at narrowing the enemy’s location down. If there is a specific landmark, such as a bush then you would say:
1/4 right of axis, 200m, red bush!
Then your fire team would happily rip that bush to pieces with their fire. If, however, there are many red bushes in the same area then you will need to be much more specific. That is where the Clock Ray Method comes in. Basically you place an imaginary analog clock face over your axis line and then designate from there exactly where the target is located. Target indication happens much the same way as without the Clock placed over the top, and for giving the location of something it follows the same pattern.
1/2 right of axis, 200m, 4 o’clock, red bush!
Your fire team will thank-you for you complete accuracy, and chalking up those confirmed kills could only help all of your chances at promotion.
Firing Orders
Ammunition is not in infinite supply, and conservation of this resource is a must if you are going on a mission that may take some time. Therefore it is necessary for the commanding Trooper to take full control of the situation and make sure that the group beneath him / her is using their ammo as efficiently as possible, while also giving as wide a scope for the mission in general as possible. That is why fire control orders have been incorporated into the Stormtrooper’s way of life. What you need is GRIT! I am sure most Troopers will say that they do have grit, but this is yet another acronym to help you remember how the commands are issued:
- Group — who is going to fire
- Range — how far away the target is located
- Indication — where and what you are firing at
- Type — type of fire
At the end of the command you also have to tell them when to fire, and there are three different commands for this. If you say Go on! then they know to fire immediately as soon as the command is finished, where as Await my command! tells them that you will be shouting Go on! at them in a few seconds time. This is used to keep an element of surprise. The other is detailed more extensively below.
Group - The group can be a full squad, half a squad or fire-team or even individuals. For the first lesson in the Communications courses you must remember CLAP — Clear, Loud, As an order, with Pauses. In the middle of a fire fight you have to make sure you stick to these so that the Troopers you want to fire hear you and understand what they are about to do.
Range and Indication - These speak for themselves really. What you must realise here is that in the middle of a battle when the troopers’ minds may be more on dodging blaster fire asking them to slow down for a second and imagine a clock-face on the end of an imaginary axis line may end up getting them shot. Short and to the point with as much information as is needed to get the job done.
Type of fire -There are several different types of fire which are used for different circumstances, such as covering fire, sustained pressure, total annihilation, or fire that takes people out without betraying your own position.
Watch and shoot! Watch and shoot! - This command tells the group you have chosen to not fire at anything unless they have a clear target. The onus is put on them to decide whether the target is a valid one and they are the ones who have to spot it.
Deliberate — This is a slow rate of fire (no more than ten shots per minute) and is the type of fire is used to prevent the enemy returning accurate fire
Snap — This is when the target appears for only a couple of seconds and you should be able to get off at least two accurate shots on the target. This one is normally used in conjunction with the Watch and shoot command. Remember that if one shot will do the trick then you don’t need to fire two shots, thus saving your ammo for another Rebel scumbag.
Rapid fire — apart from a fully automatic rate of fire this is the most forceful type, where one shot is let off every 2 seconds. The time in between means that the Trooper can readjust his or her position so that the following shot can be placed on target.
Burst — when nothing other than total annihilation will do. Troopers switch across from individual shots to automatic and lay down a wall of fire so that there is no chance of anyone or anything surviving. But we don’t allow the Troopers to go mad and hold in the trigger. Instead, controlled bursts of three to five shots are released into the target area.
Sample fire control orders:
Delta fire team — 200m — big red bush — snap fire — watch and shoot, watch and shoot!
Charlie fire team —100m —-troop transport — burst fire — goes on!
Credits
Cuchulain Darkblade
Kreeayt Havok